Installation
Install the Live Translator extension on any Chromium-based browser (Chrome, Edge, Brave, Arc, Opera, etc.).
Open the official listing: Live Translator on Chrome Web Store, then click Add to Chrome and confirm with Add extension.

You should now see the Live Translator icon in your browser toolbar. The extension is installed and ready to be configured.
Supported Platforms
Live Translator works on these websites and platforms. Simply open any of these sites and click the extension icon to start translating.
| Platform | What you can do |
|---|---|
| Google Meet | Translate meetings, narrate your voice, send chat |
| Zoom (Web) | Translate meetings, narrate your voice, send chat |
| Microsoft Teams (Web) | Translate meetings, narrate your voice, send chat |
| YouTube | Translate videos, auto-fill context from video title |
| WhatsApp Web | Translate calls, narrate your voice |
| Translate videos and live streams | |
| TikTok | Translate videos |
| Douyin | Translate videos |
| Vimeo | Translate videos |
| Dailymotion | Translate videos |
| Udemy | Translate course videos |
| Domestika | Translate course videos |
The extension captures tab audio directly, so it works with any audio playing in the browser tab on supported sites — no separate microphone setup needed for the other party's audio.
Extension Overview
A quick overview of the main interface and where everything is located.
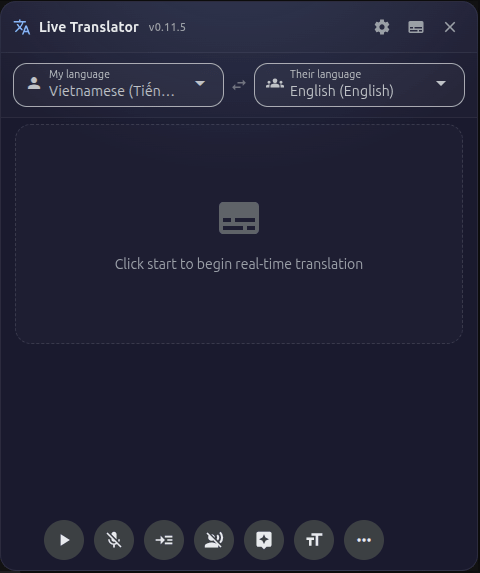
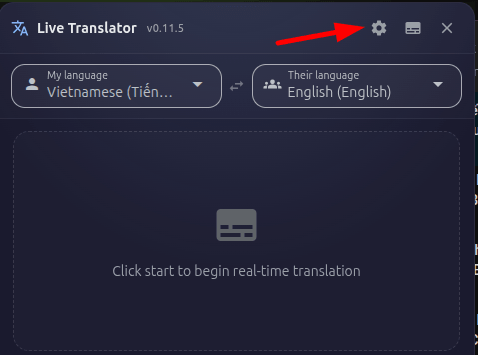
The Live Translator panel has these main areas:
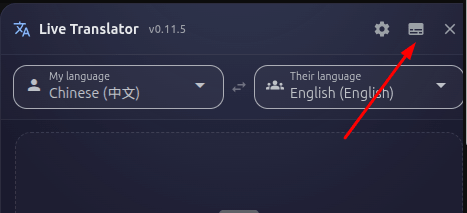
- Title bar — Settings button, Subtitle mode toggle, Close button. If an update is available, you will see a badge here.
- Language selector — Two dropdowns: "My language" (the language you speak) and "Their language" (the language you want to translate from).
- Transcript area — Where translated text appears in real time, organized by speaker.
- Control bar — Start/Stop/Pause button, microphone toggle, narration settings, AI assistant, font size, download, and more options.
You can drag the panel by its title bar to move it anywhere on the screen, and resize it by dragging the edges. This way it won't block important content during meetings or videos.
Get a Soniox API Key
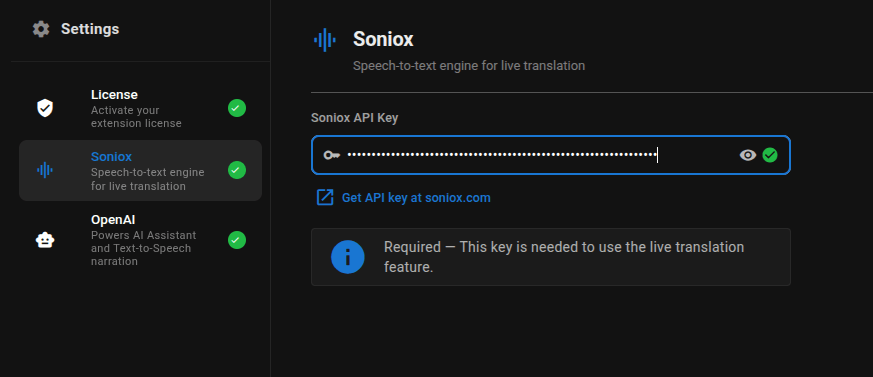
Soniox provides the real-time speech recognition and translation engine. You need a Soniox API key to use Live Translator. Required
A Soniox API key is required for the extension to work. Without it, the extension cannot transcribe or translate any audio.
Open https://console.soniox.com/signup in your browser. Create an account using your email or Google sign-in.
After signing in, navigate to the API section of your Soniox dashboard. You can also go directly to Soniox Get Started guide for step-by-step instructions.
Copy your API key — you will need it in the next steps.

Add a payment method to your Soniox account. You can use a credit card, PayPal, or other payment methods. The Soniox API is pay-as-you-go — you only pay for what you use.
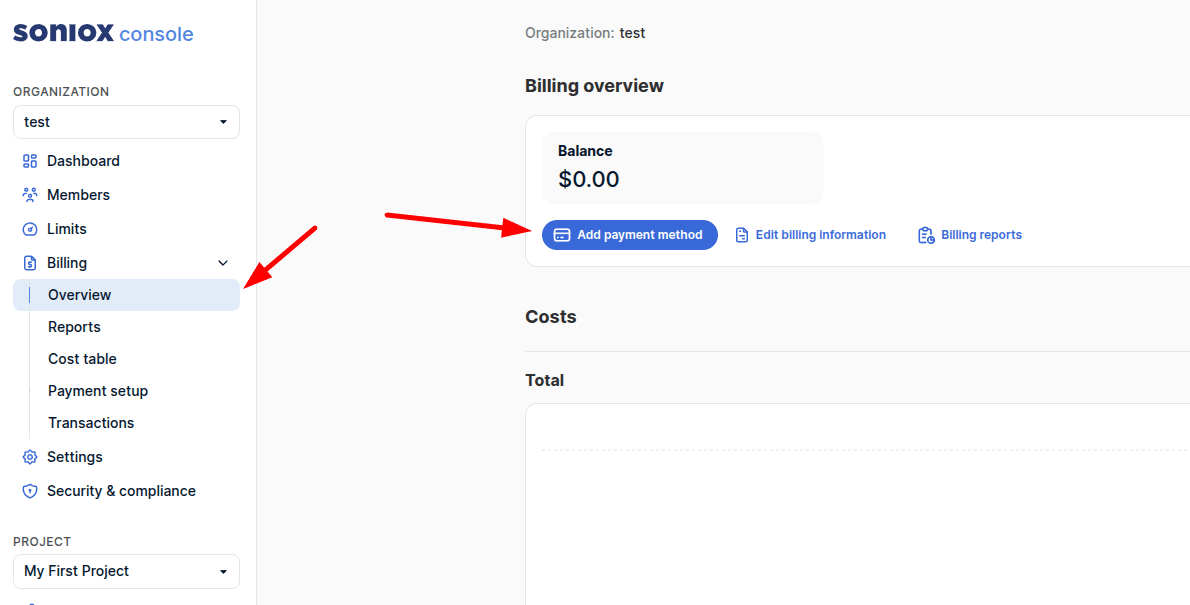
You need to deposit minimum $1 to your account to use the API. You can deposit more if you want to.
Get an OpenAI API Key (Optional)
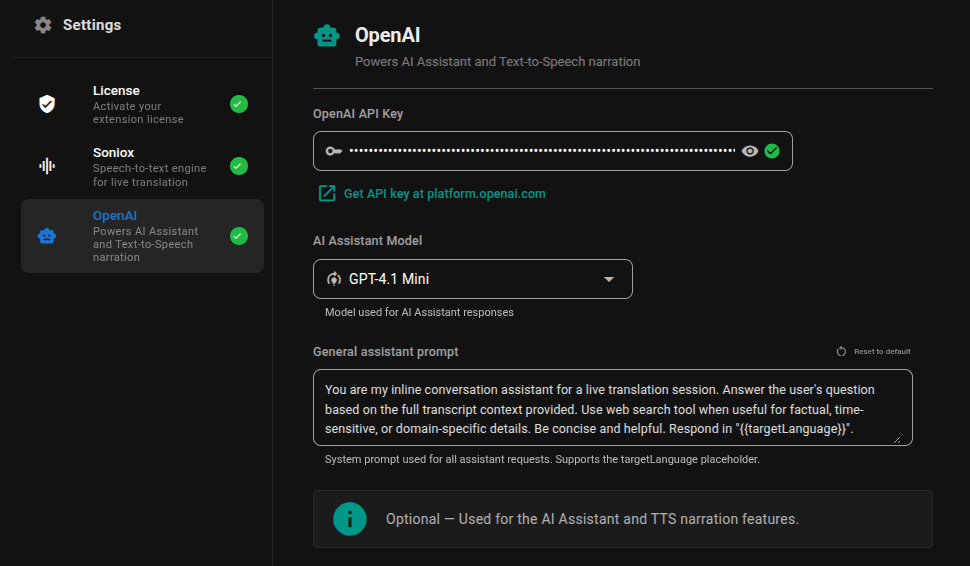
An OpenAI API key is optional — you only need it if you want to use OpenAI voices for narration or the Inline AI Assistant feature. Pro
If you don't have an OpenAI account, click "Sign Up" and create one. If you already have one, sign in.
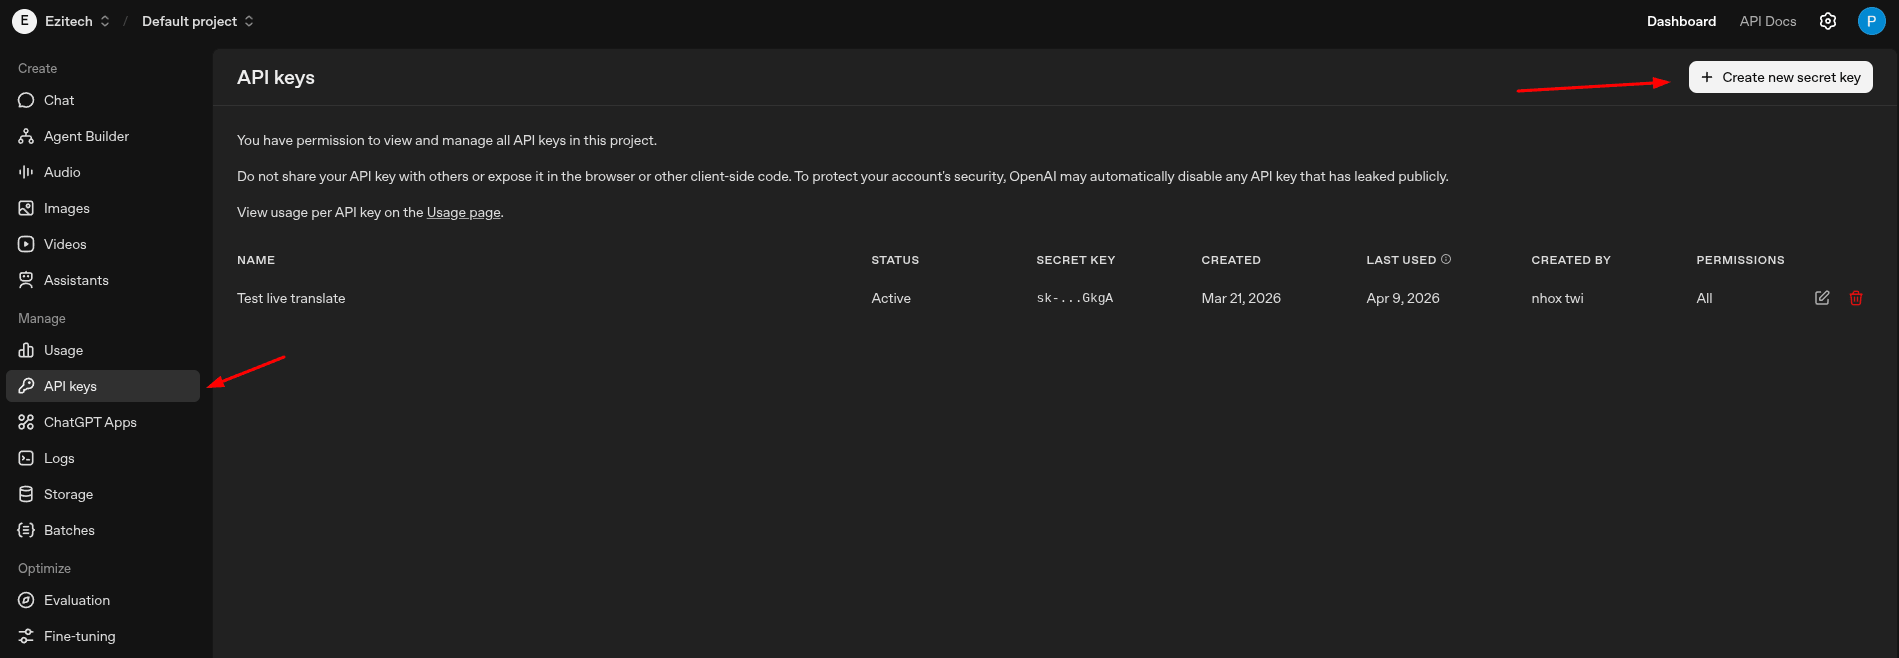
Click "+ Create new secret key", give it a name like "Live Translator", and click "Create secret key".
Copy and save the key immediately — OpenAI will only show it once.
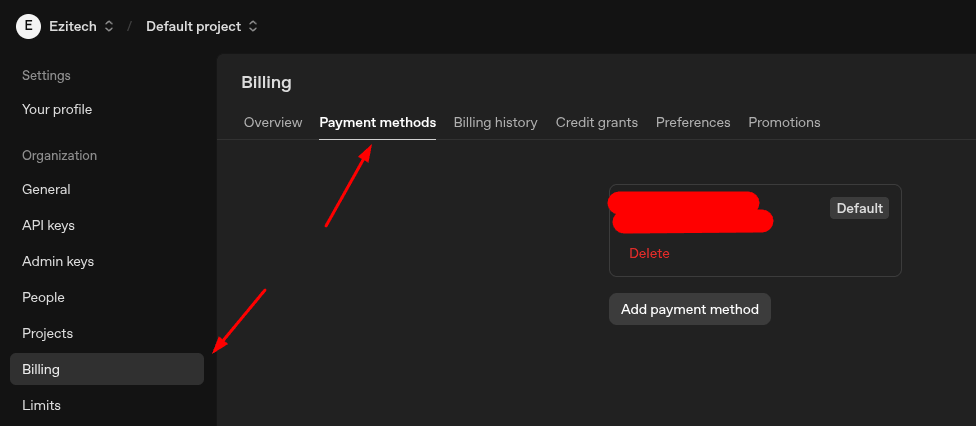
Go to Billing settings and add a payment method. The OpenAI API is pay-as-you-go — you only pay for what you use.
If you only want narration (text-to-speech), you can use Google Translate voices for free instead. The OpenAI key is only required if you want OpenAI's premium voices or the AI Assistant feature.
Get an ElevenLabs API Key (Optional)
An ElevenLabs API key is optional — add it if you want to use ElevenLabs voices in Narrate Their Voice or Narrate My Voice. Pro
Create a new ElevenLabs account, or sign in if you already have one.
Open API Keys settings, create a key (or use an existing one), then copy it for Live Translator setup.
Go to ElevenLabs subscription and billing and make sure your plan or credits are active for API usage.
ElevenLabs and OpenAI keys are optional. If you do not need premium voices, Google voices work without any API key.
Enter Your API Keys
Once you have your API keys, enter them in the Live Translator settings page.
You can open settings in any of these ways:
- Click the gear icon (⚙) in the top-right of the translator panel.
- Right-click the Live Translator icon in your toolbar → "Options".
- Go to your browser's extensions page → find Live Translator → "Details" → "Extension options".
In the settings page, click on "Soniox" in the left sidebar. Paste your Soniox API key into the input field. The key is saved automatically.
Click on "OpenAI" in the left sidebar. Paste your OpenAI API key into the input field. The key is saved automatically.
Click on "ElevenLabs" in the left sidebar. Paste your ElevenLabs API key into the input field. The key is saved automatically.
Your API keys are stored locally on your device only using Chrome's secure extension storage. They are never sent to Live Translator's servers — they are only used to communicate directly with Soniox, OpenAI, and ElevenLabs.
Buy a License Key
A license key unlocks Pro features like narration, SRT download, AI assistant, and more.
Visit the Live Translator homepage at https://translate.ezitech.io/#pricing and scroll to the Pricing section, or click the "Purchase a license" link in the extension's settings page.
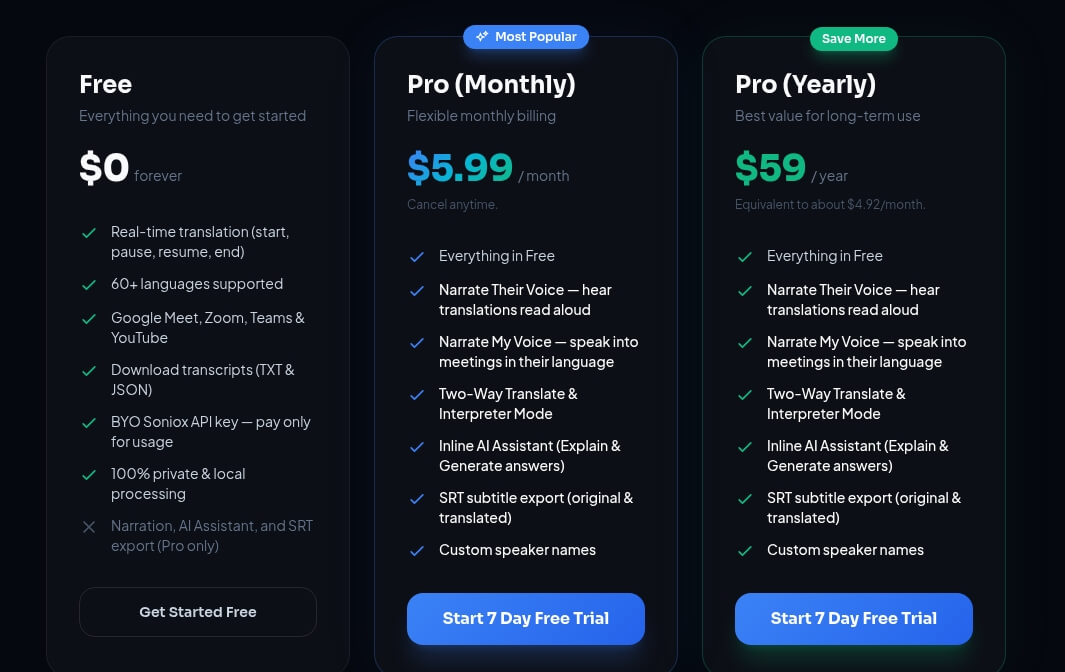
Select either:
- Monthly — $4.99/month
- Yearly — $49/year (save ~18%)
You can get a 3-day free trial to try the Pro features. After the trial, you can purchase a license to continue using the Pro features.
You will be redirected to the Polar payment page. Enter your email and payment details, then complete the purchase.
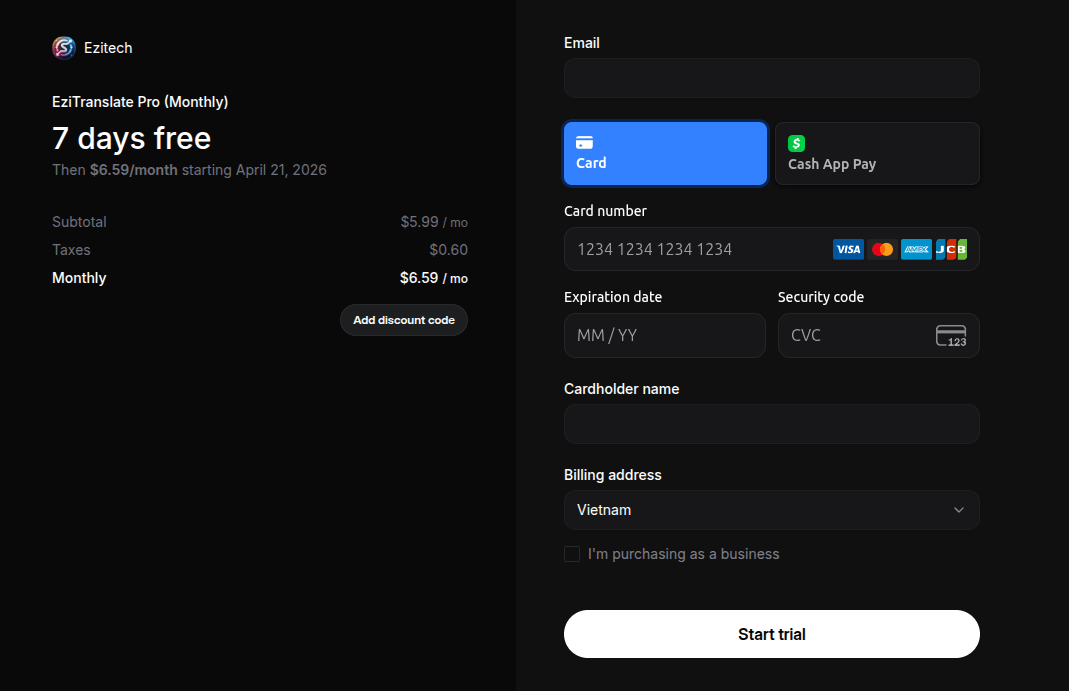
After payment, you will receive a license key via email. The license key looks like a long code (e.g., LT-XXXX-XXXX-XXXX-XXXX). Copy this key.
You can request a refund within 30 days from the payment date by contacting phampdoan@gmail.com.
Activate Your License
After purchasing, activate your license key in the extension settings.
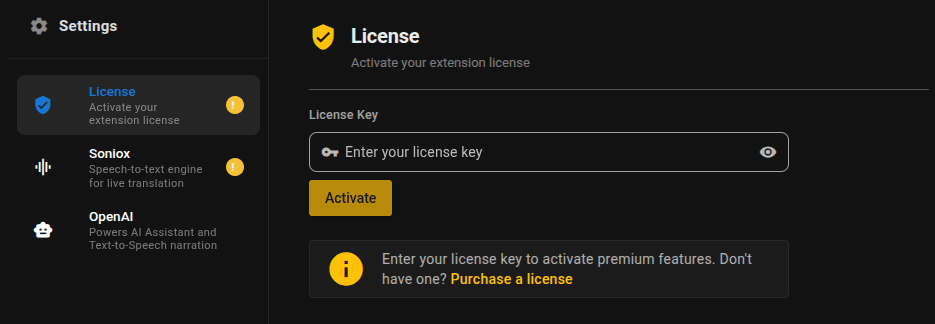
Open the extension settings (gear icon or right-click → Options). Click on "License" in the left sidebar. Paste your license key into the input field and click "Activate". The extension will verify your license with the server.
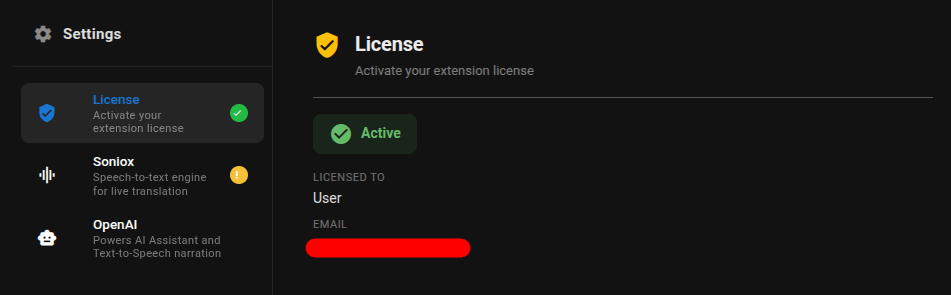
Once activated, you will see your license status, the email associated with the license, and the expiry date. All Pro features are now unlocked.
If you previously activated the license on another device, you can use the "Force Activate" option to move the license to your current device. Each license can only be active on one device at a time.
Free vs Pro Features
Here's what you can do with the free version and what requires a Pro license.
| Feature | Free | Pro |
|---|---|---|
| Real-time translation | ✓ | ✓ |
| 60+ languages | ✓ | ✓ |
| Speaker labels | ✓ | ✓ |
| Drag, resize, minimize panel | ✓ | ✓ |
| Font size control | ✓ | ✓ |
| Download transcript (TXT/JSON) | — | ✓ |
| Download transcript (SRT) | — | ✓ |
| Narrate Their Voice (TTS) | — | ✓ |
| Narrate My Voice (Interpreter) | — | ✓ |
| Send Translation via Chat | — | ✓ |
| Subtitle Mode | — | ✓ |
| Inline AI Assistant | — | ✓ |
| Context Settings | ✓ | ✓ |
| Speaker Names | ✓ | ✓ |
Start a Translation Session
Learn how to start translating in a meeting or video.
Go to any supported platform (e.g., Google Meet, Zoom, YouTube, etc.) and join a meeting or play a video.
Click the Live Translator icon in your browser toolbar. The translator panel will appear on the page. You can also click the floating icon that appears on the page.
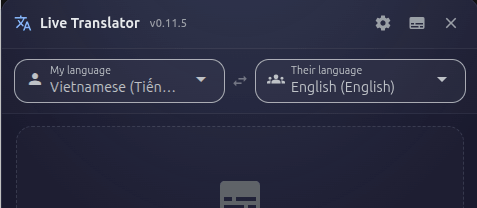
Use the two language dropdowns at the top of the panel:
- "My language" — The language you speak (e.g., Vietnamese).
- "Their language" — The language others speak that you want to translate (e.g., English).
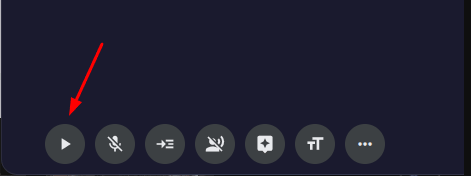
Click the Start button (play icon) in the control bar at the bottom of the panel.
Your browser may ask for permission to capture audio — click "Allow" and select the tab you want to capture.
As people speak, you will see both the original text and the translated text appear in the transcript area. Lines are automatically grouped by speaker.
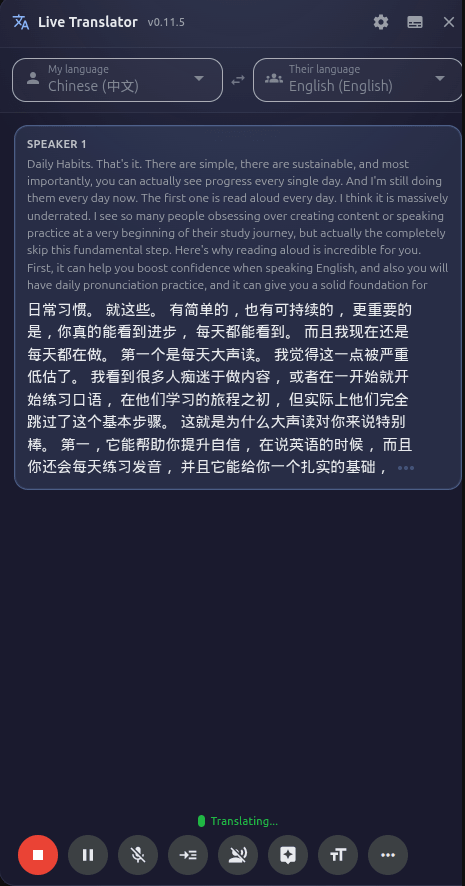
The transcript auto-scrolls to show the latest text. If you scroll up to read earlier text, auto-scroll pauses. Click the "Scroll to latest" button that appears to jump back to live text.
Controls: Pause, Resume, End
Understand the translation session controls.
| Button | What it does |
|---|---|
| Start (▶) | Begins a new translation session. Clears any previous transcript. |
| Pause (⏸) | Temporarily stops translation. The transcript is kept. Audio capture continues but text is paused. |
| Resume (▶) | Continues translation after a pause. New text appears after the previous content. |
| End (⏹) | Stops the session completely. The transcript is kept on screen until you start a new session. Ends audio capture, turns off mic and narration. |
Change Languages
You can change the translation languages at any time.
Click on either the "My language" or "Their language" dropdown at the top of the panel.
The list supports 60+ languages sorted alphabetically. Scroll or type to search for your language. Click to select it.
If a session is active, changing the language will automatically restart the translation with the new language pair. Your language selection is saved for next time.
Turn On Your Microphone
Enable your microphone so your own speech is also translated alongside the meeting/video audio.
In the control bar, click the microphone icon. The icon turns active (highlighted) when the mic is on.
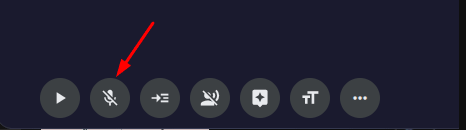
If this is the first time, your browser will ask for microphone permission. Click "Allow".
The microphone is off by default when you open the panel. Turn it on only if you want your own speech to be transcribed and translated. When you press End, the microphone automatically turns off.
Change Font Size
Adjust the transcript text size for comfortable reading.
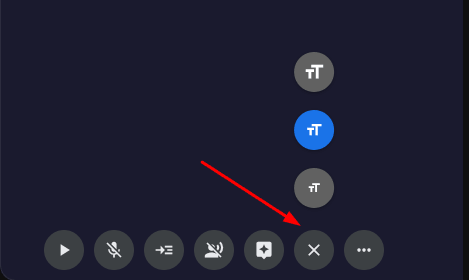
In the control bar, click the font size button (Aa icon). A menu appears with three sizes:
- Small — Compact view, fits more text
- Medium — Default balanced size
- Large — Easier to read from a distance
Click your preferred size. The change applies immediately and is saved for next time.
Speaker Names
Assign real names to speakers so you can easily identify who said what in the transcript. Free
In the control bar, click the "More" button (⋯ icon). Then click "Speaker Settings" button.
The Speaker Settings dialog will open.
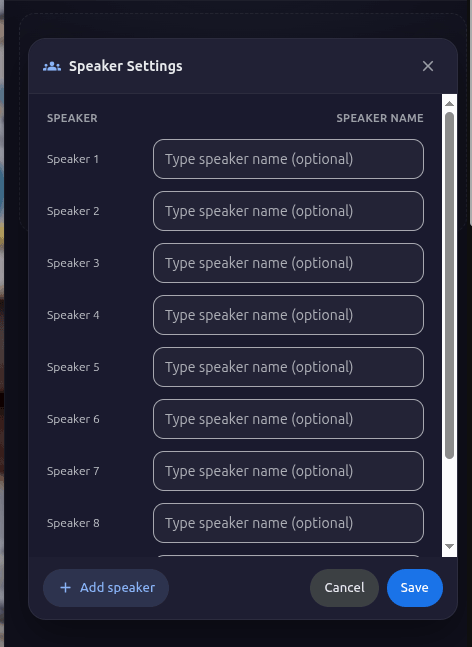
You will see a list of detected speakers (Speaker 1, Speaker 2, etc.). Type a real name next to each one (e.g., "John", "Sarah"). Click "Add row" if you need more.
Click "Save". All transcript lines — past and future — will now use the names you assigned.
Narration (Text-to-Speech)
Have translations read aloud to you so you can listen instead of reading. This is the "Narrate Their Voice" feature. Pro
In the control bar, click the narration button (speaker icon). The Narration Settings dialog opens.
Select your voice provider:
- Google Translate (Free) — Works without any API key. Good quality voices in 60+ languages.
- OpenAI (Premium) — Higher quality, more natural voices. Requires an OpenAI API key.
Select a voice from the dropdown and click "Test" to preview how it sounds.
Adjust voice speed and volume if needed.
Click "Narrate Their Voice" button in the dialog. Now, whenever a translation appears, it will be read aloud to you.
To stop, click the narration button again and click "Stop".
YouTube Caption Narration
Use YouTube translated captions as the narration source, so the extension reads the language you already selected on YouTube. This feature can reduce Soniox costs on YouTube by up to 99.9%. Pro
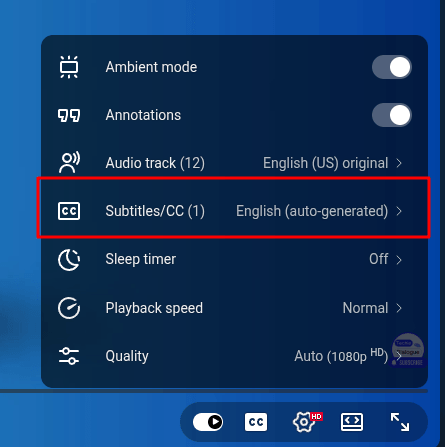
For this feature to work correctly, set the caption language on YouTube first, then start narration in the extension.
In the YouTube player, turn on captions and choose your target translated caption language (for example: Vietnamese).
Open the extension's Narration settings and turn on Auto detect translated caption.
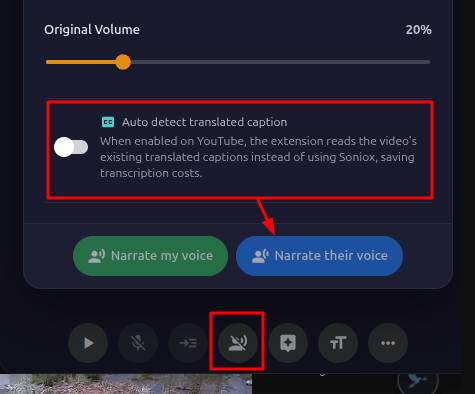
Click "Narrate Their Voice". The narration will follow the translated caption language you selected on YouTube.
If you want Vietnamese narration, first set YouTube captions to Vietnamese. After that, enable Auto detect translated caption and start "Narrate Their Voice".
Narrate My Voice (Interpreter Mode)
Speak in your language and have your translated voice played to other meeting participants — like having a personal interpreter. Pro
This feature works on Google Meet, Zoom (Web), Microsoft Teams (Web), and WhatsApp Web. You need your microphone enabled and a translation session running.
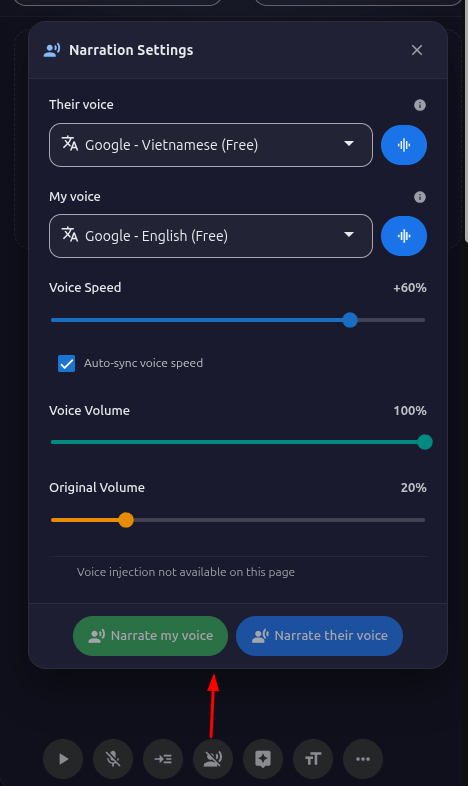
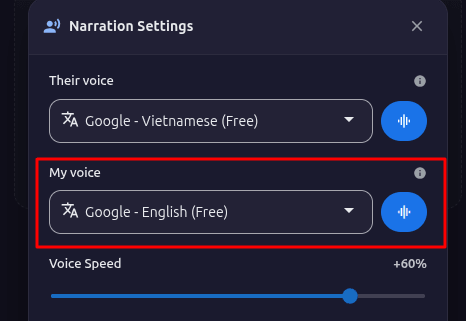
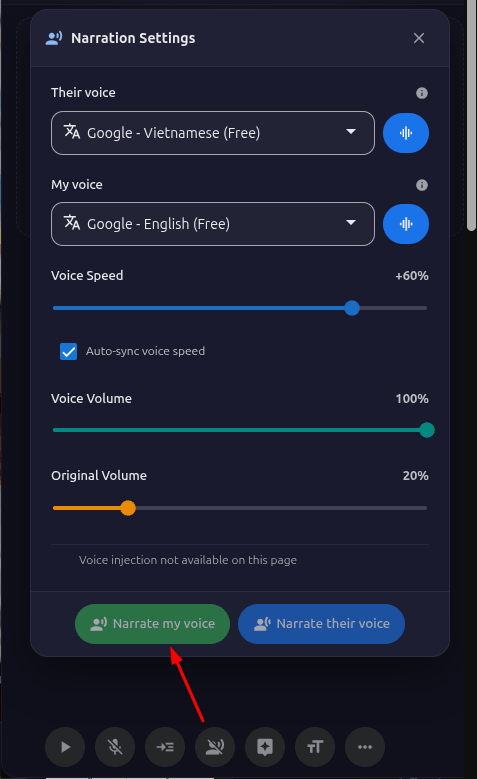
Click the narration button in the control bar to open the Narration Settings dialog.
In the dialog, find the "Narrate My Voice" section. Choose your preferred voice and provider (Google or OpenAI). You can set a different voice for "My voice" and "Their voice" narration.
Click "Test" to preview your selected voice.
Click "Start Narrate My Voice". When you speak, your words are:
- Transcribed in your language
- Translated to the other language
- Spoken aloud in the meeting so the other person hears your translated voice
Your microphone is automatically muted while the translated audio plays to prevent echo.
Click the narration button and then "Stop", or press End to stop the entire session (which also stops narration).
You can only run one narration mode at a time — either "Narrate My Voice" or "Narrate Their Voice", not both simultaneously. The toolbar icon changes to show which mode is active.
Send Translation via Chat
Automatically send your translated speech as text messages in the meeting's chat. Pro
In the control bar, look for the chat send button (next to the microphone icon). Click it to toggle on — the button turns green when active.
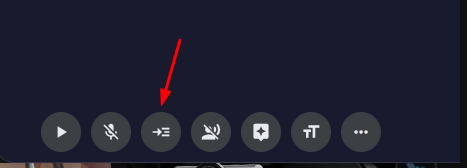
With your microphone on and a translation session running, when you speak, your translated text is automatically inserted into the meeting's chat input and sent.
This works on Google Meet, Zoom (Web), and Microsoft Teams (Web).
This is useful when "Narrate My Voice" is not available for your platform, or if you want both voice narration AND text chat translation simultaneously.
Subtitle Mode
Switch to a minimal, movie-style subtitle bar that shows only the latest translation at the bottom of the screen. Pro
In the title bar of the translator panel, click the subtitle icon (closed captions icon).
The full panel will be replaced by a slim subtitle bar at the bottom of the screen.
Click the tune icon (settings gear) on the subtitle bar to adjust:
- Opacity — Slide to make the bar more or less transparent.
- Font size — Choose from small, medium, or large text.
You can also drag the subtitle bar to move it, and resize it by dragging the edges.

Click the close button (✕) on the subtitle bar to return to the full translator panel.
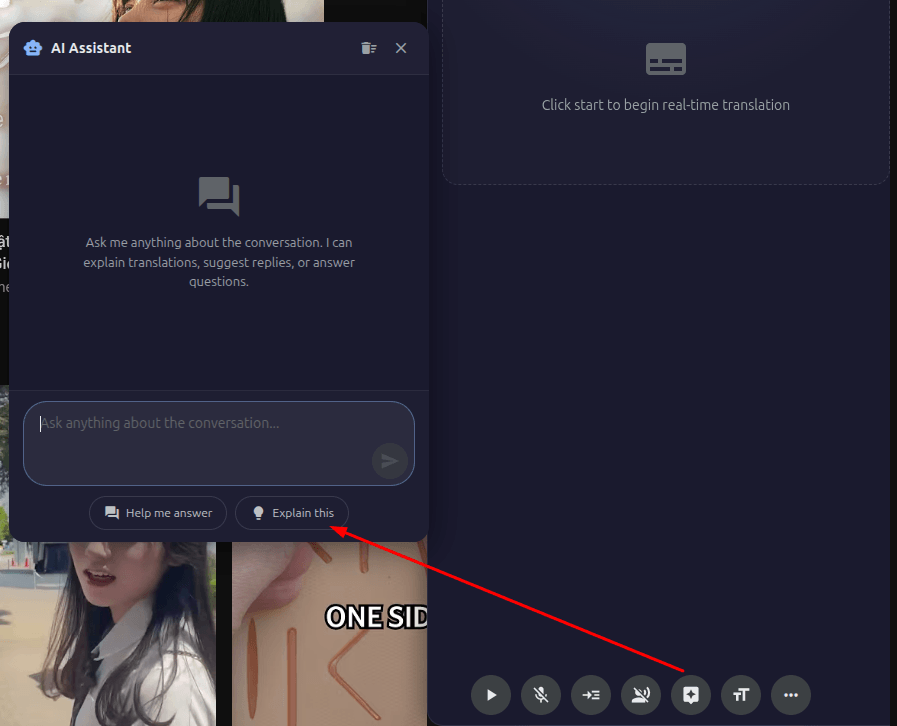
Inline AI Assistant
Get AI-powered explanations and generated answers based on the conversation context, right from the transcript. Pro
The Inline AI Assistant requires an OpenAI API key to be configured in settings.
Explain a line
When you hover over any line in the transcript, an AI icon (🤖) appears.
The AI assistant opens in a separate window. It will use the full transcript context and the selected line to give you a detailed explanation.
Generate an answer
The AI assistant will generate a suggested answer based on what was said in the conversation. It can even use web search to provide more accurate answers.
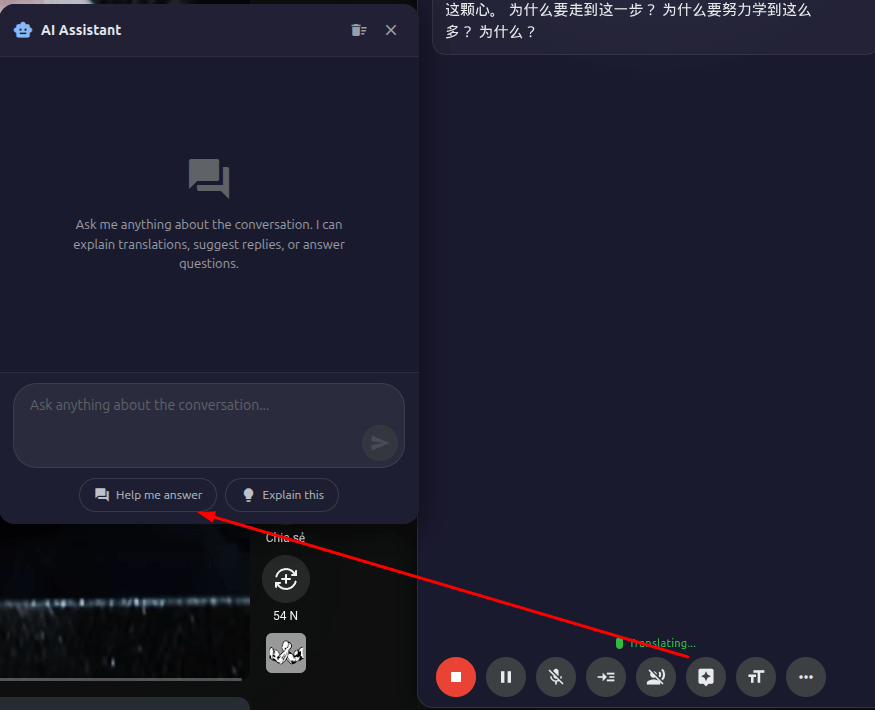
Open the Assistant panel
You can also open the AI assistant panel directly from the assistant button (🤖 icon) in the control bar. This opens a draggable chat window where you can type any question. The assistant has access to the full transcript as context.

Context Settings
Provide context about the conversation topic to improve translation accuracy. Free
Click the "More" button (⋯) in the control bar, then click "Context".
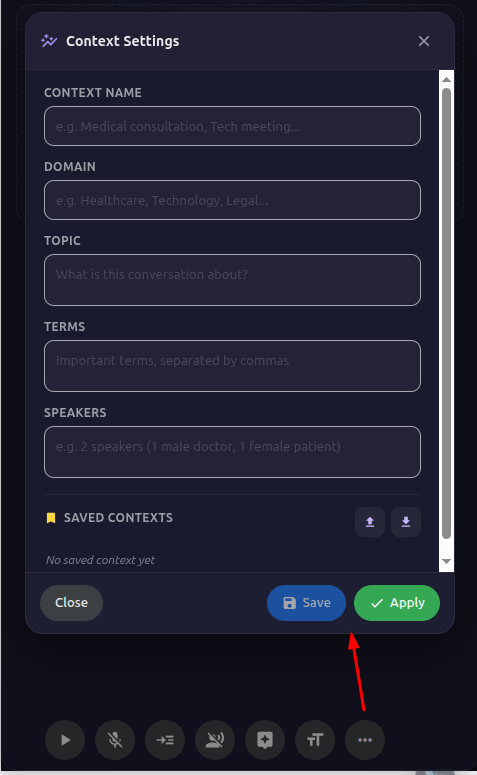
You can provide:
- Domain / Topic — What the conversation is about (e.g., "Medical conference", "Software engineering standup").
- Key terms — Technical terms, proper nouns, or jargon that might be hard to recognize (e.g., "Kubernetes, API gateway, microservices").
- Speaker info — Names and roles of participants (e.g., "Dr. Smith — cardiologist, presenting").
Click "Apply" to send this context to the translation engine for the current session.
If you have recurring meetings with similar topics, click "Save Preset" to save the current context. Next time, just load the preset instead of typing everything again.
You can also Import/Export presets as JSON files to share or back them up.
When using Live Translator on YouTube, the context fields can be automatically filled with the video's title and description. This helps the translation engine better understand the video's topic.
Download Transcript
Save your translated transcripts as files for later reference or use in other tools. Pro
After a translation session (or during one), click the download button (↓ icon) in the control bar. The Download Transcript dialog opens.
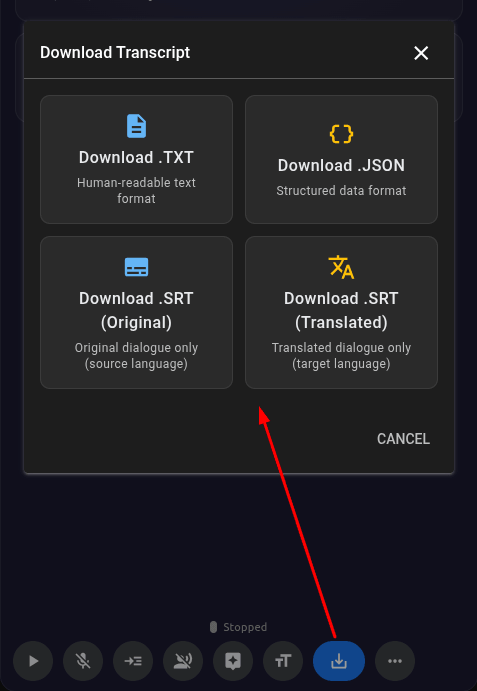
Select your preferred format:
| Format | Best for |
|---|---|
| TXT | Simple text file with timestamps and speaker names. Easy to read. |
| JSON | Structured data format. Good for processing with other tools or scripts. |
| SRT (Original) | Subtitle file with the original language text. Use in video editing software. |
| SRT (Translated) | Subtitle file with the translated text. Use in video editing software. |
Click the download button for your chosen format. The file is generated in your browser and saved to your default download folder.
Transcript files are generated entirely in your browser. No transcript data is sent to any server during the download process.
Auto Update Check
The extension automatically checks for updates each time you open it.
When a new version is available, you will see an "Update available" badge in the title bar of the translator panel.
Click the badge to open the Chrome Web Store listing and verify you are on the latest version. Store installs update automatically after a new version is published.
Troubleshooting
Common issues and how to fix them.
"No Soniox API key" message
No audio is being captured
- Make sure you clicked "Allow" when the browser asked for audio capture permission.
- Make sure you selected the correct tab to share when prompted.
- Try refreshing the page and opening the translator again.
- Check that the meeting/video actually has audio playing.
Translation seems inaccurate
- Make sure the "Their language" dropdown is set to the correct language being spoken.
- Use Context Settings to provide topic information and key terms.
- Ensure the audio quality is clear — background noise can affect accuracy.
"Narrate My Voice" — others can't hear the translation
- Confirm you are on a supported platform (Google Meet, Zoom Web, Teams Web, WhatsApp Web).
- Make sure a translation session is running and your microphone is on.
- Check that you have a Pro license activated.
- Try refreshing the meeting page and starting again.
OpenAI features not working
- Verify your OpenAI API key is entered correctly in settings.
- Make sure your OpenAI account has billing set up with sufficient credits.
- If you don't need OpenAI features, use Google Translate voices for narration instead (free, no API key needed).
Extension not appearing on a website
- Live Translator only works on supported platforms. It will not appear on unsupported websites.
- If the site is supported but the extension doesn't show, try refreshing the page.
- Make sure the extension is enabled in your browser's extension management page.
Contact & Support
Need help? Have a question or suggestion?
Contact the developer:
- Email: ezsolu.io@gmail.com
- Website: https://translate.ezitech.io
- WhatsApp: +84 355 561 599
- Telegram: EziTech
If you have ideas for new features or improvements, we'd love to hear from you. Send us an email with your suggestions!